
What is This?
Call Center Pro provides advanced call management settings and reporting features to KAZOO’s basic Call Center application. These include the ability to add and delete agents, customize routing strategies based on your agent team skills, define advanced hold options and loops, and settings to manage and prioritize queues.
Before you start
- Note only Administrator can create and delete queues. Managers can edit them
- Confirm your agents/members are listed with correct phone numbers
- Create a list of extensions to reserve for the call center behaviors
- Decide on your “hold” message: music, message, or queue time
- Develop your strategy around agent behaviors and where /how they should be assigned
- Consider the use of skills for your agents that would direct calls accordingly.
Call Center Pro STEP GUIDE details
Below are the sections covering Call Center Pro.
- Steps for configuring and editing call queues
- Overview of queue management dashboard features
- Overview of the queue performance dashboard
- Summary of permissions and access, agent v. manager v. administrator
Quick Steps
- Create a new queue and assign it a unique number or extension
- Configure your desired queue settings
- Define how calls should be routed to Agents
- Define hold treatment – music or recording
- Define agent behavior, how calls should be routed
- Assign Members
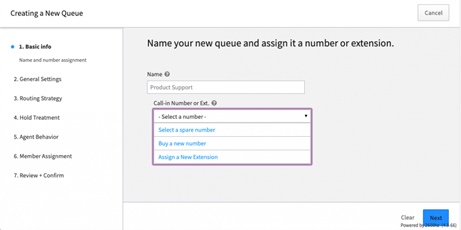
STEP 1: Create New Queue
Select a number or extension from your available numbers list. If you do not have any displayed, you can purchase one. If you want to choose an extension you will be shown choices based on your setup.
NOTE: Only administrators have access to creating a new queue.
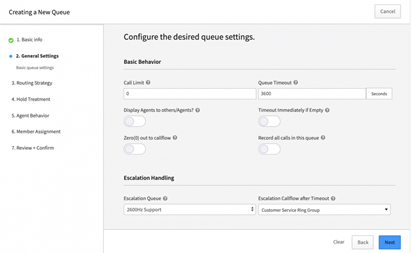
STEP 2: Define Queue Settings
Existing users will recognize some of the settings from Call Center and can skip to the new settings. Below is an overview of all the settings on this screen. The settings in green are new to Call Center Pro.
Basic Behavior
Call Limit
Sets the numbers of calls that can be in a queue before the calls time out to the callflow steps.
If the call limit is one, any new call that tries to enter the queue will be terminated (dropped). If the call limit is 0, the number of calls that can enter the queue is infinite (or limit to incoming trunk limitation). Any incoming call that is dropped will be counted toward Missed Calls for that queue, since it has entered the queue and subsequently terminated.
Queue Timeout [seconds]
The number of seconds the call will sit in a queue before timing out.
- If Escalation Handling is configured, the call will timeout to the specified escalation handling destination.
- If No Escalation is configured, the call will terminate or drop.
- Maximum queue timeout is 7200 seconds.
CCPro: Display Agents to other Agents
This is useful so agents can note the status of the rest of the team, for example if others are away. If enabled, Agents can see other Agents who are members of the queue on the Queue Details page, Members tab. By default, this is not enabled; agents will see only themselves on the Members tab.
- Admins assigned through Smart PBX can see all members’ status of any agent in any queue in CCPro
Timeout Immediately if Empty
If turned on the and the queue is empty (meaning no agents are logged in) the call will immediately be routed to the callflow process. This could be your escalation queue or voicemail.
NOTE: The queue is not considered Empty if an agent in a queue is Globally in an Away state or on a call.
CCPro: Zero out to callflow
This provides a dropdown showing other queues you can redirect a call to by pressing #0. An example might be if someone calls who has already been escalated to a different department or person and is calling back with more information.
The default routing for 0’d out calls is set as follows:
- Device
- User
- VM Box
- Directory
- Group (per Smart PBX Configuration)
CCPro: Record all calls in this queue
If turned on all calls will be recorded by default.
Alternatively, you can set record all calls for individual agents under the Call Center Members tab.
Notes:
- Transferred calls will be recorded up until the point the agent who answered the call from the queue is no longer on the call.
- Hold Music is not recorded if the Agent puts the caller on hold
- Currently the maximum length of call that can be recorded is 1hr.
For the Call Recording feature to be enabled you MUST enable these apps in your system:
— Google Drive connector
— Call Recording
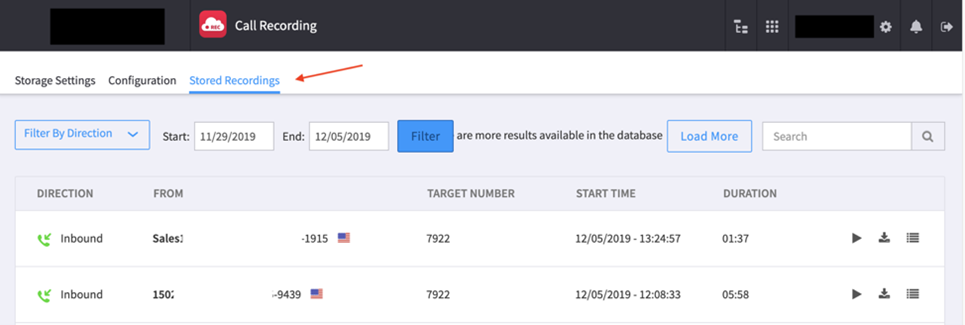
Recorded calls can be viewed and downloaded from the Call Recording app. at the end of the call
Escalation Handling
NOTE: This must be configured if you intend to use the new Call Center Pro feature assigning skills to your agents for skills-based call routing.
Escalation Queue
If any type of timeout is reached, calls in the current queue can be routed to the Escalation queue. Options list all available queues under the account for anyone who has queue modification permission.
Escalation Callflow after Timeout
If enabled with a destination, a Queue call is timed out to the Escalation Queue, and if the call is not answered within the Escalation Queue Timeout, the call will be redirected to the following Call flow Destination
- Company Directory
- Devices
- Users
- Voicemail Boxes
- Group
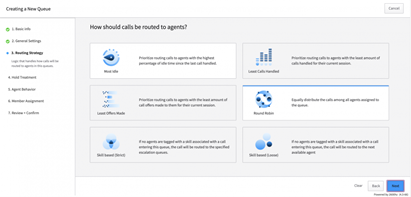
STEP 3 – Pick Routing Strategies
In this step you will define how calls will be routed to agents within the queue, setting priorities based on specific metrics
The first four options are part of the basic Call Center app:
Most Idle
This prioritizes routing calls to agents with the highest percentage of idle time since the last call handled.
- Calls will continue to be offered to agent with the most idle until the agent answers the call.
- After a call is handled, the most idle counter resets. For example, if agent 1, 2 ,3 are members of a queue and are on a call, if agent 2 hangs up first then 3 then 1. Agent 2 is the most idle agent.
- If a call is rejected by the most idle agent, it will continue to try that agent until the agent either answers the call or becomes unavailable.
Least Calls Handled
This prioritizes routing calls to agents with the least amount of calls handled for their current session.
- Least handled called agent during their session will be offered a new call.
- If multiple agents are tied for least handled call offer, queue selects an agent at random.
- If agent logs out of session, and log back in, their handled call count will reset and the agent will become the least calls handled.
- Changing state from away/available does not impact the count.
Least Offers Made
This prioritizes routing calls to agents with the least amount of call offers made during their current session.
Round Robin
This will equally distribute the calls among all agents assigned to the queue.
- Agent 1, 2, 3, 4 are logged in and Ready
- Queue might select Agent 2, 3, 4, 1 for call offers order.
- If Agent 1 doesn’t answer the call, it would go to call 2, if agent 2 answers the call, any new call will get offered to call 3.
CCPro Call Center Pro provides two additional options, Skill based (strict) and Skill based (loose). These are settings that allow you to tag a skill to some of your agents and send the call to them based on caller response. To create and manage the skill sets, see the section below on setting up and managing call center members
Skill based (Strict)
This will send a call only to an agent that matches the skill defined. If there are no available agents with the (Spanish speaking for example) skill, then the call will be escalated
- If no agents are tagged with a skill associated with a call entering this queue, the call will be routed to the specified escalation queues.
- If a call entering queue matches an agent who is a member with that skill, the call will only be offered to that agent.
- If a call enters queue that does not match any skill the currently assigned members have, the call will be routed Escalation Handling. If Escalation Handling is not configured, the call hangs up.
- Skills conflicts or incomplete skills matching a Strict Skill strategy will result in routing calls to Escalation Handling.
- NOTE: For skills-based routing to work, you must define an Escalation Queue process. If neither the Escalation Queue nor the Escalation Call flow after timeout are configured the incoming call will hang up when it enters the queue. When configured, if a call is not met by a skill, the call will be routed to the specified Escalation destination.
Skill based (Loose)
This will try send a call to an agent that matches the skill defined. If there are no available agents with the (Spanish speaking for example) skill, then the call will go to the next available agent.
- If Agent X has skill that matches an incoming call, regardless of the agent state (Inactive, Active, Ready, Away, Logged off) and as long , the call will wait in queue till the Agent is Ready and Available state unless escalation handling is met (Escalation Queue or Escalation Call flow after timeout)
- If call enters queue where none of the members have any skills that match it, the call will be routed to the next available agent in a round-robin fashion.
- Skills conflict in Loose Skill strategy will result in routing to the next available agent with that skill in a round-robin fashion.
- For example, Agent1 has Skill X. Skill X contains a configuration for area codes that start with (+1585). Agent Y has a Skill that matches (+1 585 361 1962). If I were to call into a loose Queue from 585 361 1962, since both agents match, the call will find the first available agent that matches. If the routing is rejected or device timeout is reached, the call is offered to the next available agent that matches the skill.
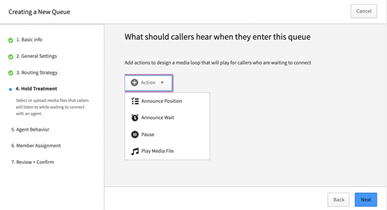
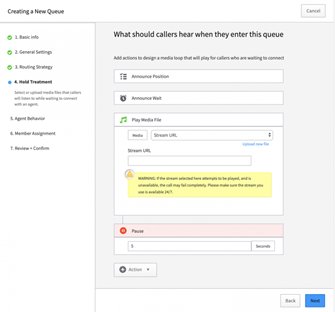
STEP 4 Define Hold Treatment
These settings define what a caller experiences when s/he is put on hold. In Call Center basic, you could choose a single Media file, either an announcement of music. Call Center Pro gives you added features and allows you to define and sequence your own series of announcements and music.
CCPro In Call Center Pro there are 3 additional options. These allow you to build out your own media loop; connect all four options and arrange in the order you set. You can then set it to repeat. This allows for several different announcements during the wait and an updated status on the caller’s position in the queue and/or wait time.
Announce Position
Announce to caller waiting in the queue their current position in the queue.
Announce Wait
Tells caller the average wait time. This is estimated from the average time taken by the last 5 calls answered. Calls sitting in the queue do not affect the estimation.
Pause
Define a pause as a break between 2 other notices.
Play Media File
Define an announcement or music clip.
Note you can add more than one announcement in the loop. Additionally you can change each media file separately without building a new queue. For example, you can add in holiday music, a new promotion or news release at different times in the year.
NOTES:
- If you choose a media Stream URL, the site must be available for connecting 24/7. If KAZOO tries to access the stream and fails, the call will be aborted.
- We support .mp3 URLs or shoutcast servers. In either case, the URL must start with shout://. Below are some examples:
- MP3 files
- Stream URL
- Stream URL
http://mp3stream7.apasf.apa.at:8000/listen.pls - KAZOO URL
shout://mp3stream7.apasf.apa.at:8000
- Stream URL
- The list will automatically loop during the hold for as many seconds you defined in the configuration (Step 2), so there’s no need to duplicate an event in the loop.
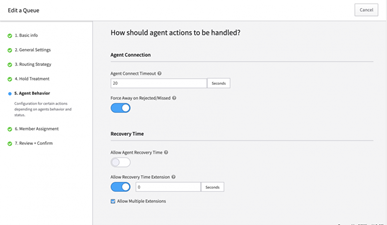
STEP 5 Agent Behavior
This configures certain actions depending on the agent’s behavior and status.
SET AGENT ACTIONS
Agent Connection
- Agent Connect Timeout
This sets the amount of seconds the call will ring at an agent’s extension before it is sent to another agent of the next event in your callflow. How the seconds translate to number of rings will vary depending on your country and ring style, but in general a 20 second setting will allow the phone to ring 4-5 times.
- Force Away on Rejected/Missed
If enabled, and if agent rejects or does not answer the offered queue call, agent will be put in a Global Away state.
NOTE: It is up to the agent to re-activate his/her status.
Recovery Time
- Allow Agent Recovery Time
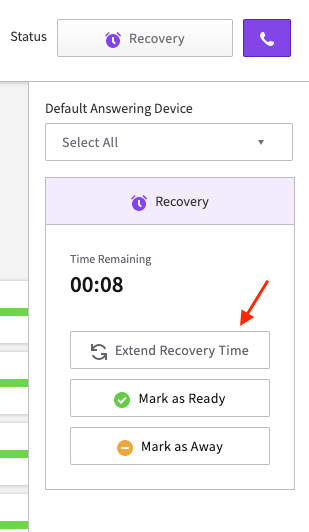
This sets the amount of seconds an agent’s status will be set to “recovery time.” This time is often used so agents can write follow up notes about the call. While in recovery time the agent’s phone will be considered “busy” to the caller and the call will route to the next agent or event. The recovery time will be displayed and counted down in the Call Details Drawer.
- Allow Recovery Time Extension
If this setting is on, the agent will see an option to extend recovery time in the Caller Display Drawer. By selecting this, recovery time will extend the length of the initial setting.
- NEW in CCPro Allow Multiple Extensions
If this checkbox is enabled and agent has the ability to extent the recovery time as often as necessary. Each extension will be the number of seconds set in the Allow Recovery Time Extension field.
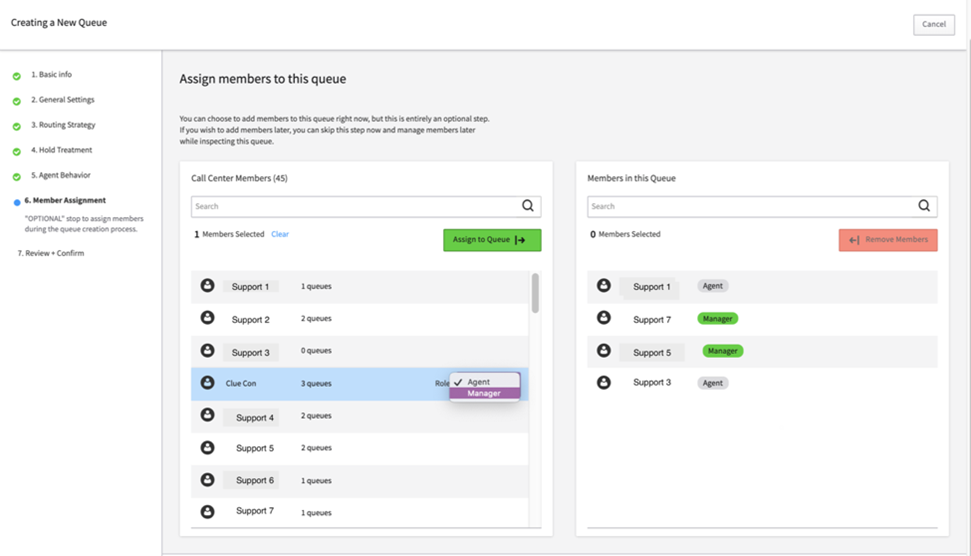
STEP 6 Member Assignment
The next step is optional and can be completed and updated as you get more familiar with the queue and member dynamics.
ASSIGN MEMBERS TO THE QUEUE
You can choose to add members to your queue, or you can add members later. You can skip this step now and manage members later while inspecting this queue.
NOTE: Once any members are assigned, the queue is limited to those members.
ADD MEMBERS
To assign a member, click on the member name, and choose between an Agent or a Manager. Then pick the green button “Assign to Queue” and you’ll see the name move to the right column.
Once a member is added and logs in, this screen will display
An Agent can set specific settings related to his/her own queue priorities.
Agents who have been given permission to “display agents to other agents” under general settings can view the activity and status of other agents in the queue.
A Manager has added permissions to:
- Listen / Whisper / Barge Agent’s calls
- Assign priorities and skills to Agents
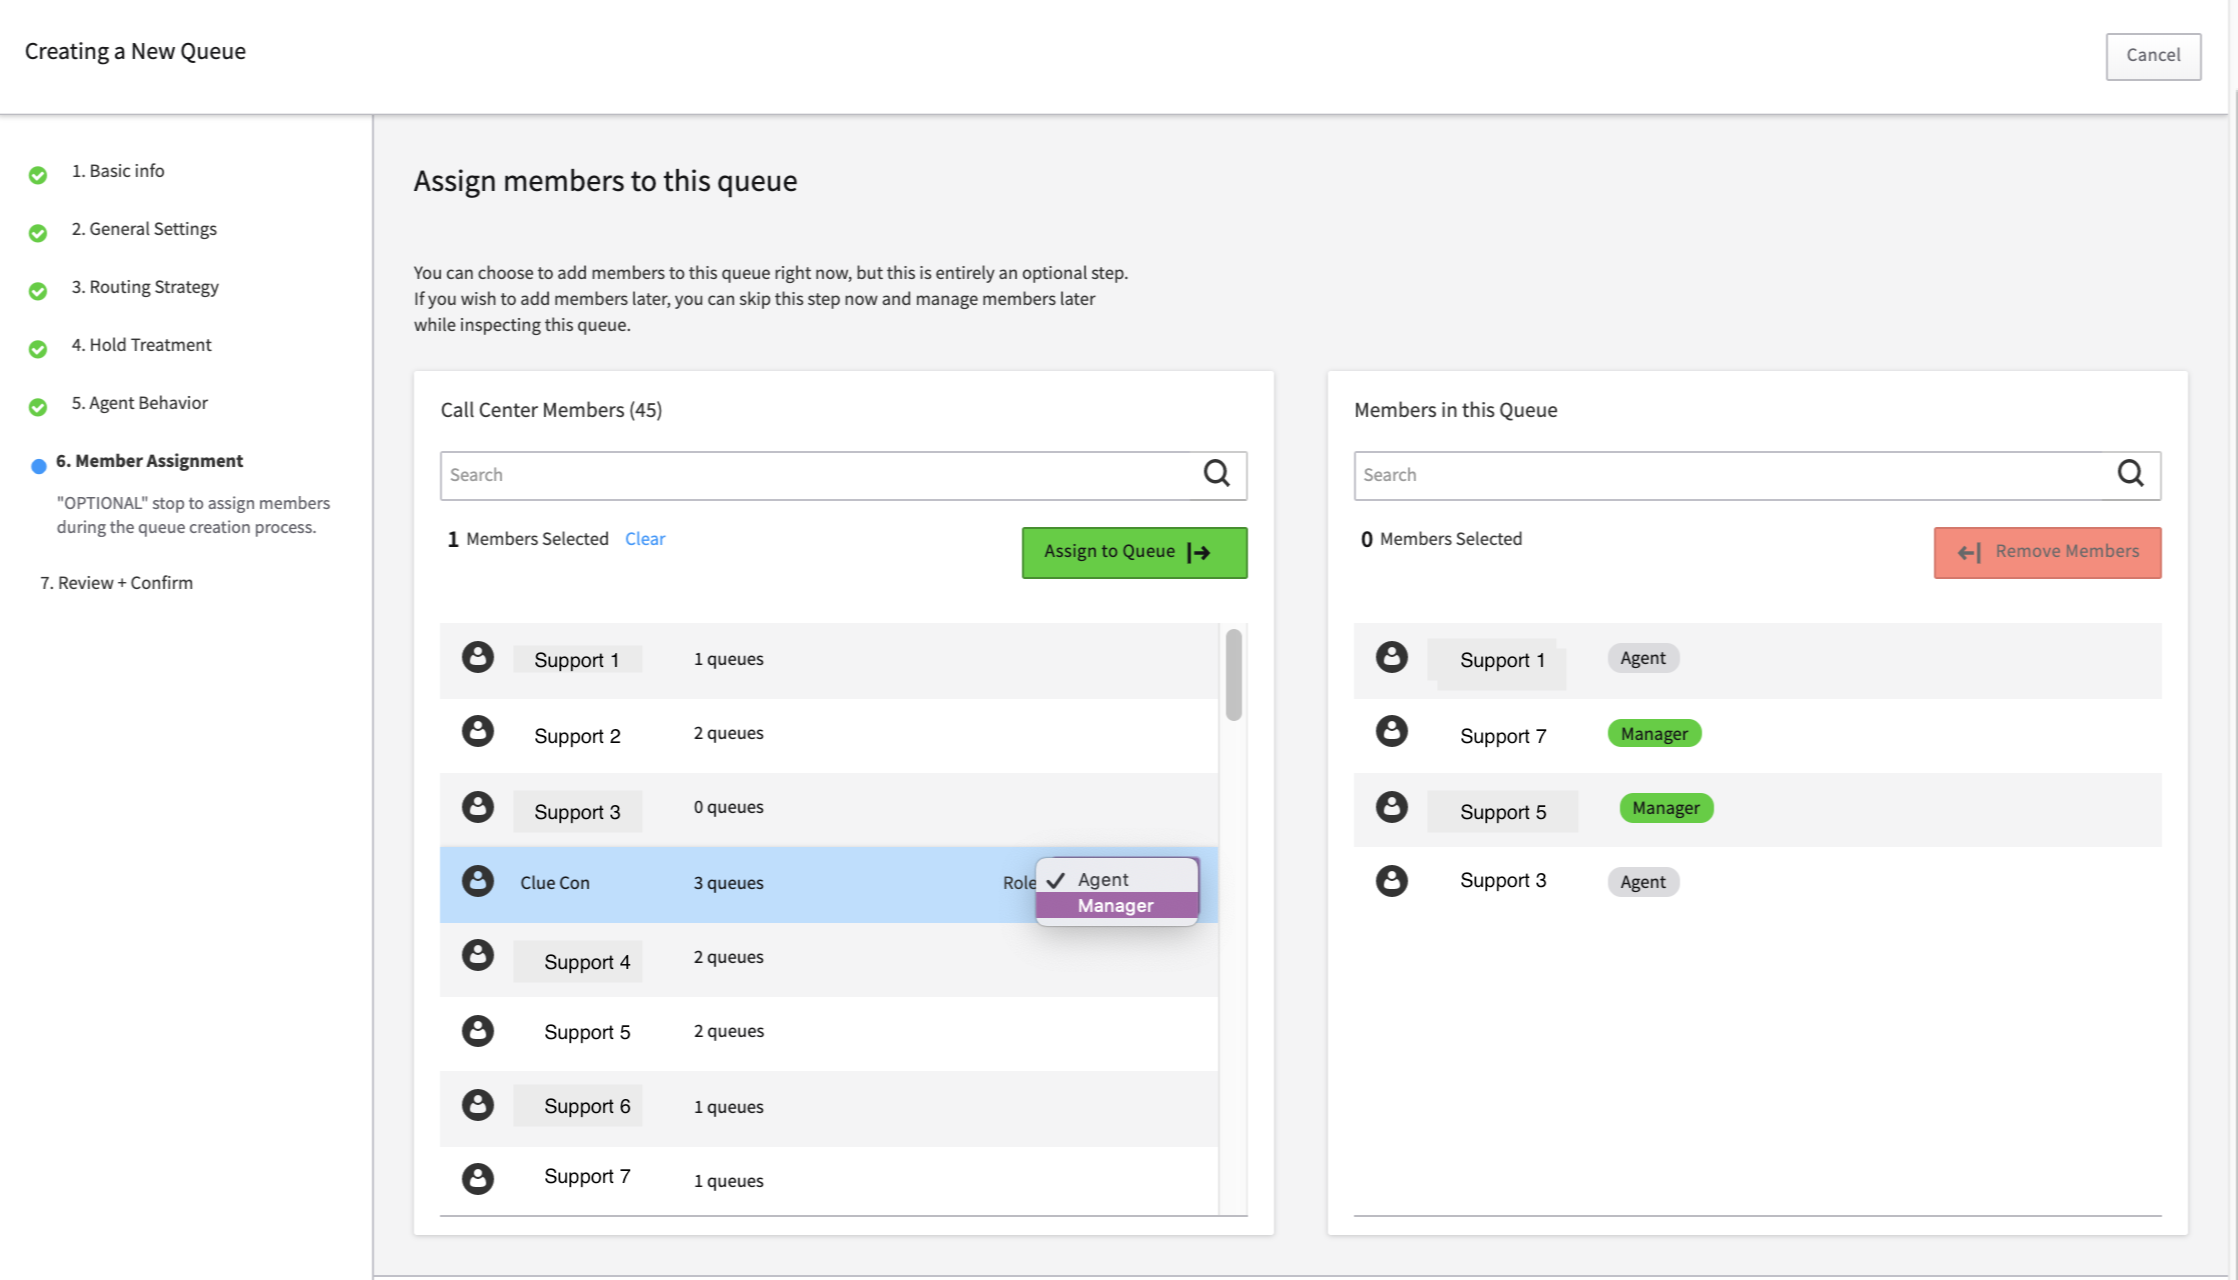
STEP 7 Review and Confirm
You will now be shown a summary screen of your settings to review and confirm. You can return to any of the steps to edit your settings. When you are finished, select the green Create Queue button at the lower right of the screen. You can also download this information and print it to share with your team (see icons at top right of screen).
Confirm updated charges
Finally, you will see a preview of your updated monthly charges based on your configuration.
Review this and Select OK.

Call Handling Dashboard: View / Manage Queues
This describes the features shown once your queues are created and when a specific queue is selected.
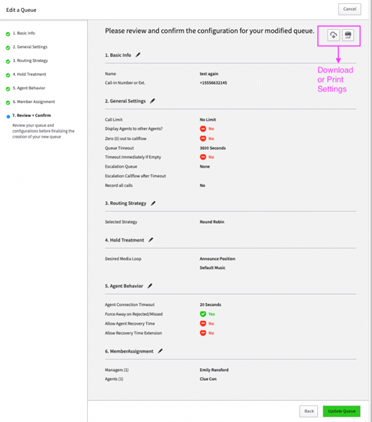
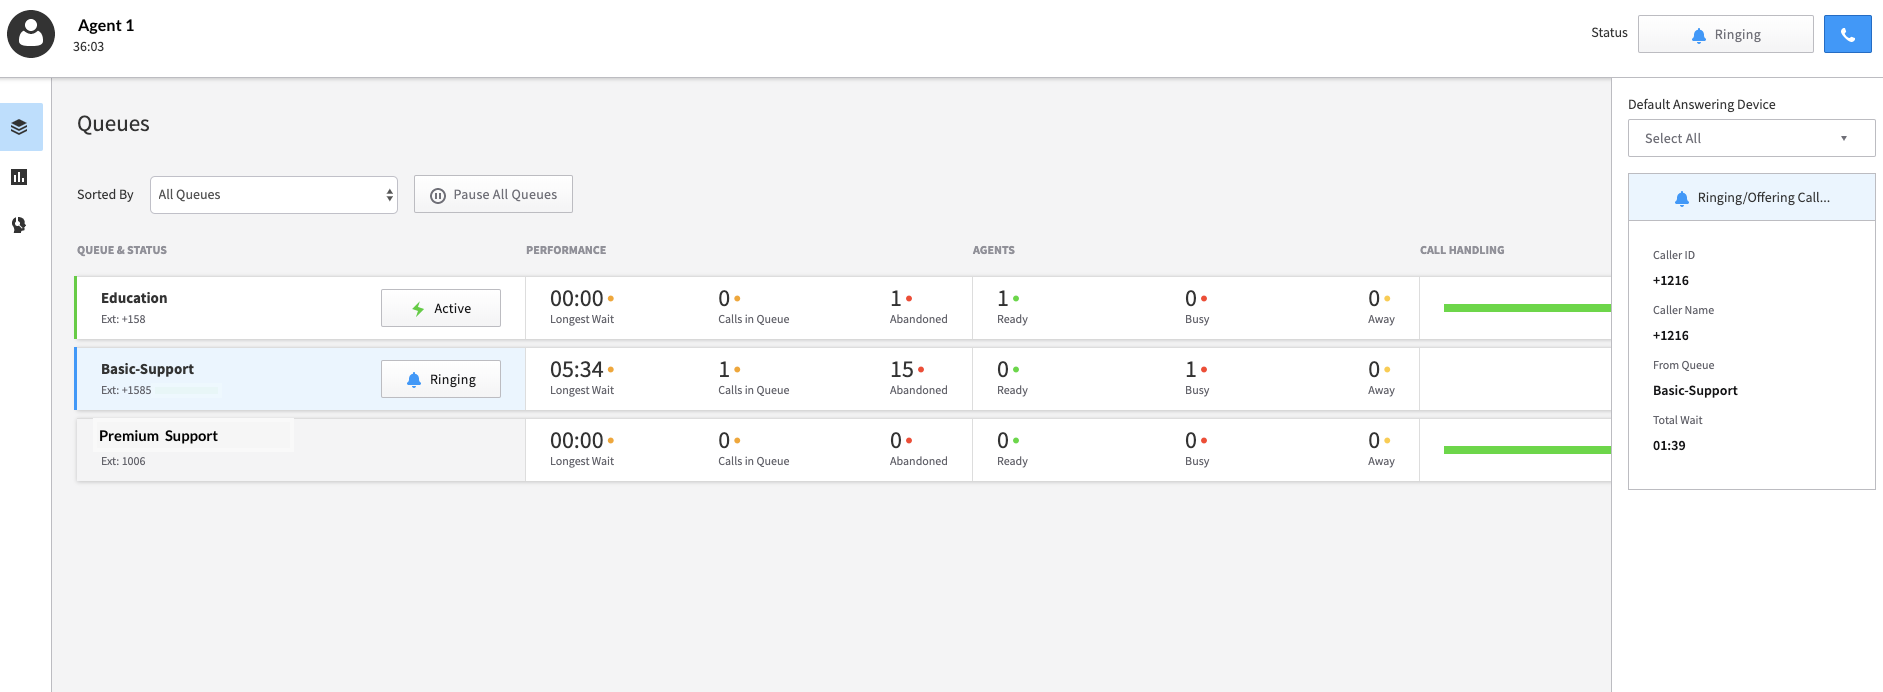
AGENT STATUS
This should match the status set at the top right of your screen. The status setting is a global setting and applies to all queues. This is also where you set/confirm the answering device you will use as default.
Status Details
- Ready Count (Must be Active+Ready). If Agent is Paused and Ready it will not count towards Ready
- Away An agent is away if Agent is Logged in but paused in that queue or Agent is Active in the queue and Away Globally
- Busy Agent is considered Busy of that queue if Agent answered a call from that specific Queue. The Busy counter will increment by
- NOTES:
- If an agent is newly assigned to a Queue. The Agent will automatically be in a Paused State
- Note if Agent is using Feature Code, Agent must log in to Browser set themselves in an active state before using feature code functionality. Feature codes are global
- At this time, regardless of what away message is put in the text field of away message, the status will always be AWAY. Custom Away messages will be implemented in a future release.
- If an agent is newly assigned to a Queue. The Agent will automatically be in a Paused State
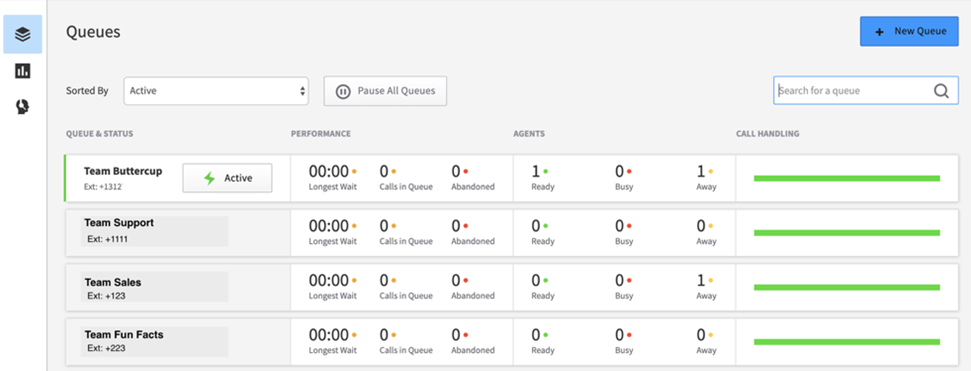
LIST OF ALL QUEUES
Once your queue is created you can view a list of the queues created in your account.
You can manage this page as follows:
Sorted By
Sorted By will only list the following options.
- All queues (Default)
Oldest queue (Creation time) will always be on top and the Newest Queue will be at the bottom - Active
Sort By Active, pushes all active queues at to
If you are an admin, Active queues will be pushed up to the top and it will list Queues that are paused next, then the queues the admin is not a member. - Paused
Sort By Paused, pushes all paused queues top, then active queues.
If you are an admin, paused queues will show up top, then active queues, then queues the admin is not a member of.
Admins
- Will see all queues available under that account.
- Admins who are not a member of any queues will not see the “Active” nor “Paused” buttons next to the queue.
Pause / Resume all Queues
This allows the agent to manage only the queues the Agent is a member of.
- If an agent selects “Pause All Queues” calls will not be offered to the agent
- To set back to Active, select “Resume All Queues”
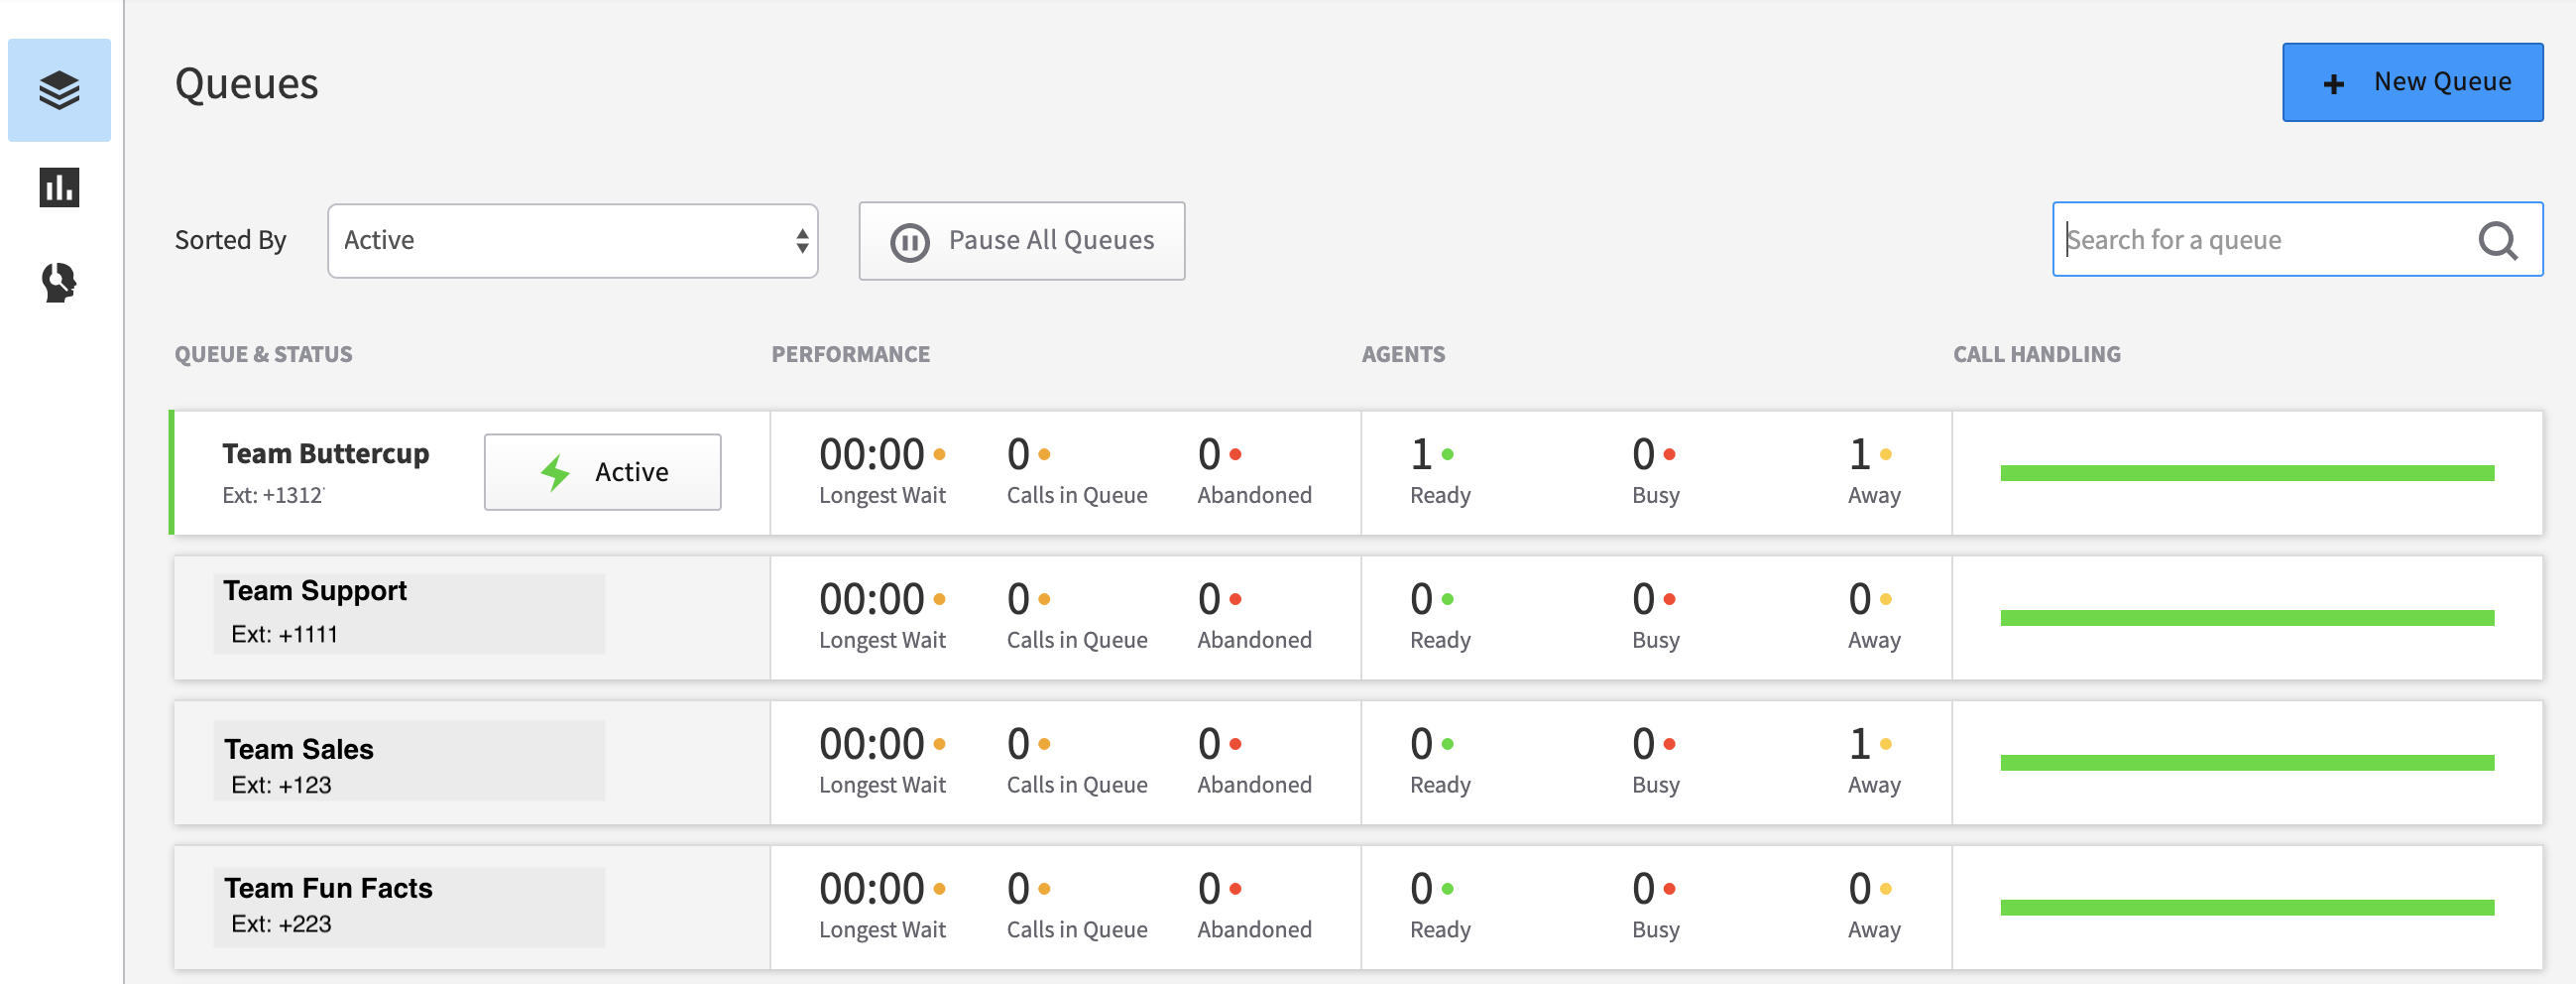
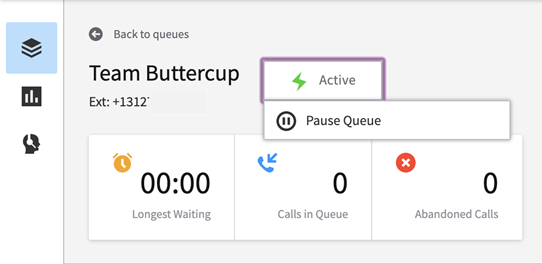
QUEUE DETAILS PAGE
Click on a queue name to see detail list.
- The top status bar shows detailed information for the session
- If there are active calls in the queue, there will be a list of waiting calls. Manager and/or Administrators can:
- Answer a call
- Change the order/priority of a call
- Eavesdrop Whisper, or Barge into a call in session
NOTE: The member call handling bar includes a summary for all the queues the member is active in at the time.

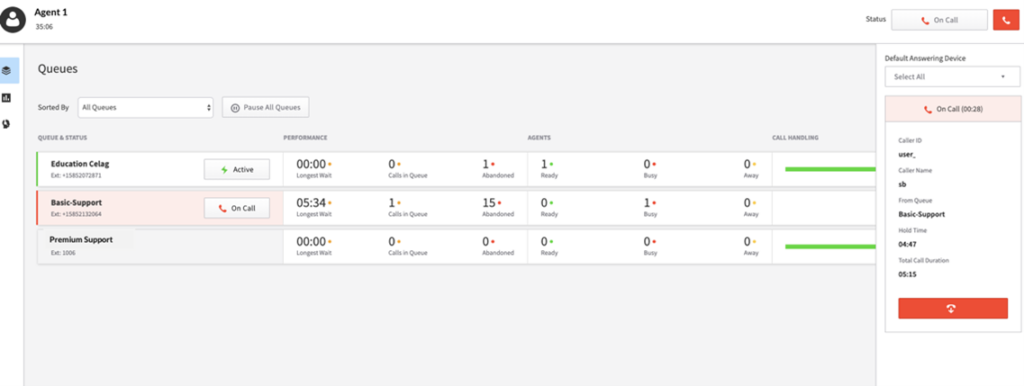
CALL HANDLING
See the screen shot above, where the red arrow is pointing. This will show the calls handled v. missed by each agent. It will not inlcude any abandoned or dropped calls.
NOTE: This value shows total calls handled and missed, including calls from any other queue that the agent is assigned to.
QUEUE STATUS
We have added the ability for managers to change the queue status. This setting is the one next to the queue name. This is helpful if you have regional queues, and want to Pause them during specific hours.
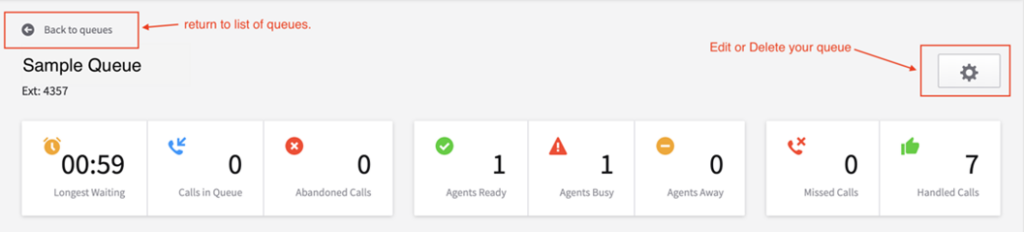
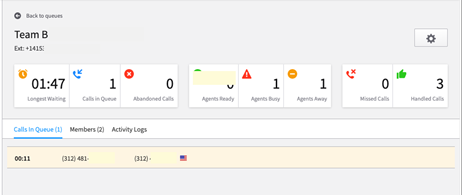
DASHBOARD
The top section of the screen will display a dashboard summarizing the status of all agents in your queue within the last hour. This can help a manager or administrator decide if it’s necessary to adjust the number or mix of agent skills.
- Longest Waiting
How long the longest caller was waiting. Longest Wait is only updated when the longest call waiting in queue is delivered to an agent. The longest wait for a queue is currently 10 seconds and a new call waits in a queue for 6 minutes and 49 seconds before being delivered to an agent (Answered by agent), then then the longest wait is 6.49. - Calls in Queue
Total number of calls waiting in the Queue. - Abandoned Calls
A call is considered abandoned when the following occurs:- The caller hung up the call while waiting in the queue.
- The caller pressed 0 for added options (voicemail, etc.). This only available if the “Zero Out” configuration is configured in the queue settings.
- Agents Ready
How many agents are available to answer calls. An agent is considered ready when they are active in a queue and Ready as a global status. If Agent is Paused and Ready it will not count towards Ready - Agents Busy
An agent is considered Busy if the Agent answered a call from that specific Queue. The Busy counter will increment by 1. - Agents Away
How many agents have marked Away as their status. An agent is considered away if Agent is Logged in but paused in that queue or if the Agent is Active in the queue and Away Globally - Missed Calls
A call is considered a missed call when the call times out for any reason.- This includes if a call enters the queue and that call reaches the Call Limit as set in the queue configuration.
- Each time a call is offered to an agent and the agent does not answer, the call is considered missed and the count will increment.
- If a call rings the agent again, the count will increase if the agent does not answer the call. Abandoned calls are not considered a missed call.
- While a call is offered (ringing).
- Handled Calls
Number of calls that were answered by agents in the queue.
TABS BELOW DASHBOARD

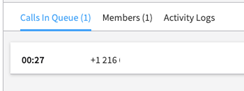
CALLS IN QUEUE
- This first tab will list all calls waiting in queue. Information includes how long the calls have been waiting in queue, Caller ID and Caller Name, including Country of Origin.
- Tab will have a counter of total calls waiting in the queue
- For managers and admins, additional options are available, see below. These are visible if you hover over the call information.
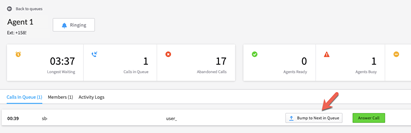
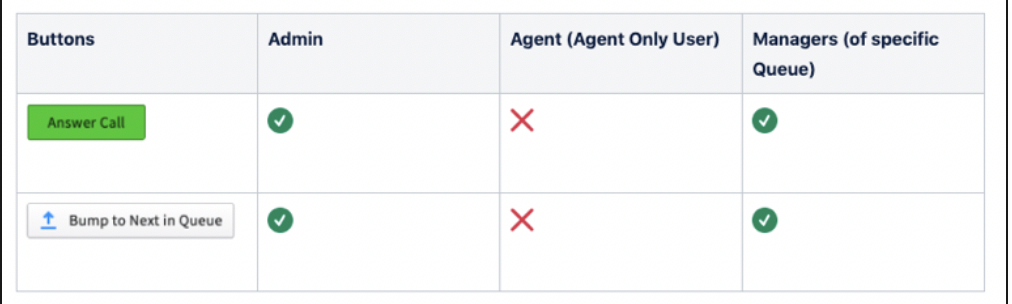
Answer Call + Bump to Next in Queue
Answer Call
- Managers or admins can pick up any call in the queue by clicking “Answer Call”
Bump to Next in Queue
- Managers or admins can also Bump a Call to Next in Queue, , making this call the next call to be offered to an agent.
- Note: The bump button will still be visible even if only one call is in the queue but it would not do anything.
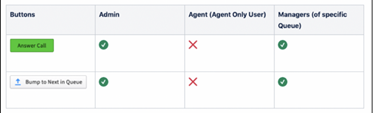
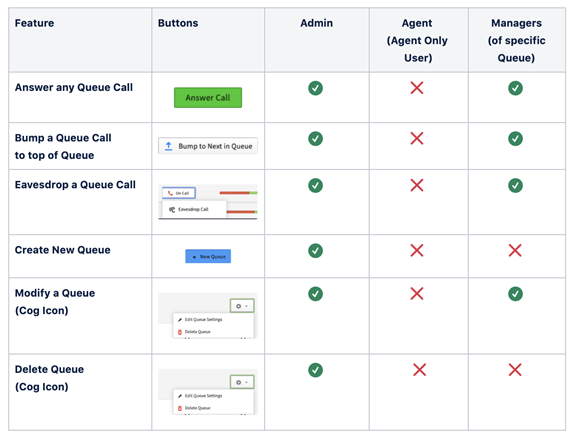
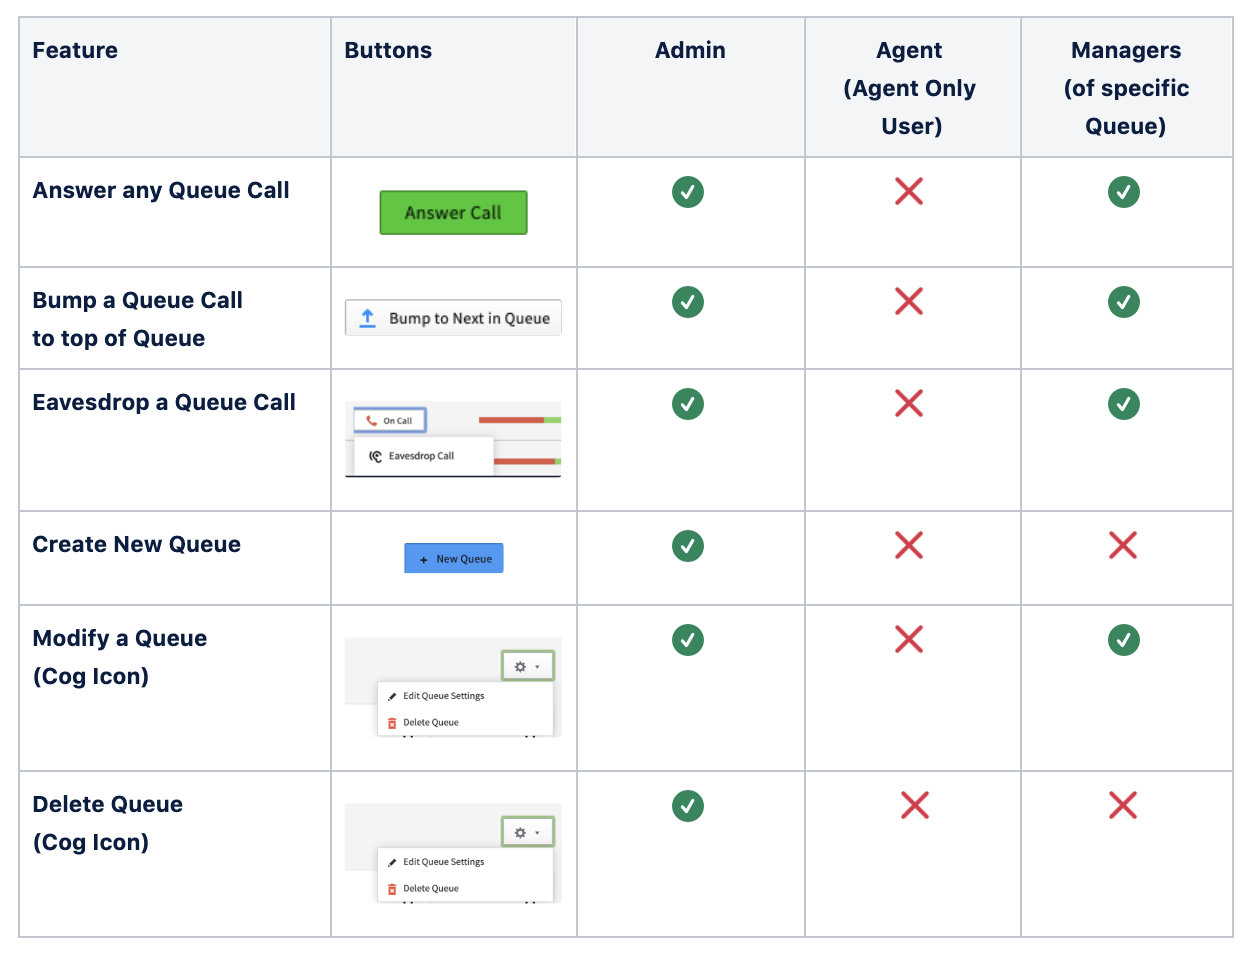
Button Permissions
- Only Admin users will have the ability to “Answer Call” and “Bump Next in Queue” at all times without being members of any queue
- Managers have access to “Answer Call” and Bump Next in Queue” buttons for any queues that they are a member of.
- The agent only users will not have access to any visibility to “Answer Call” or “Bump Next in Queue” buttons.
Summary of permissions
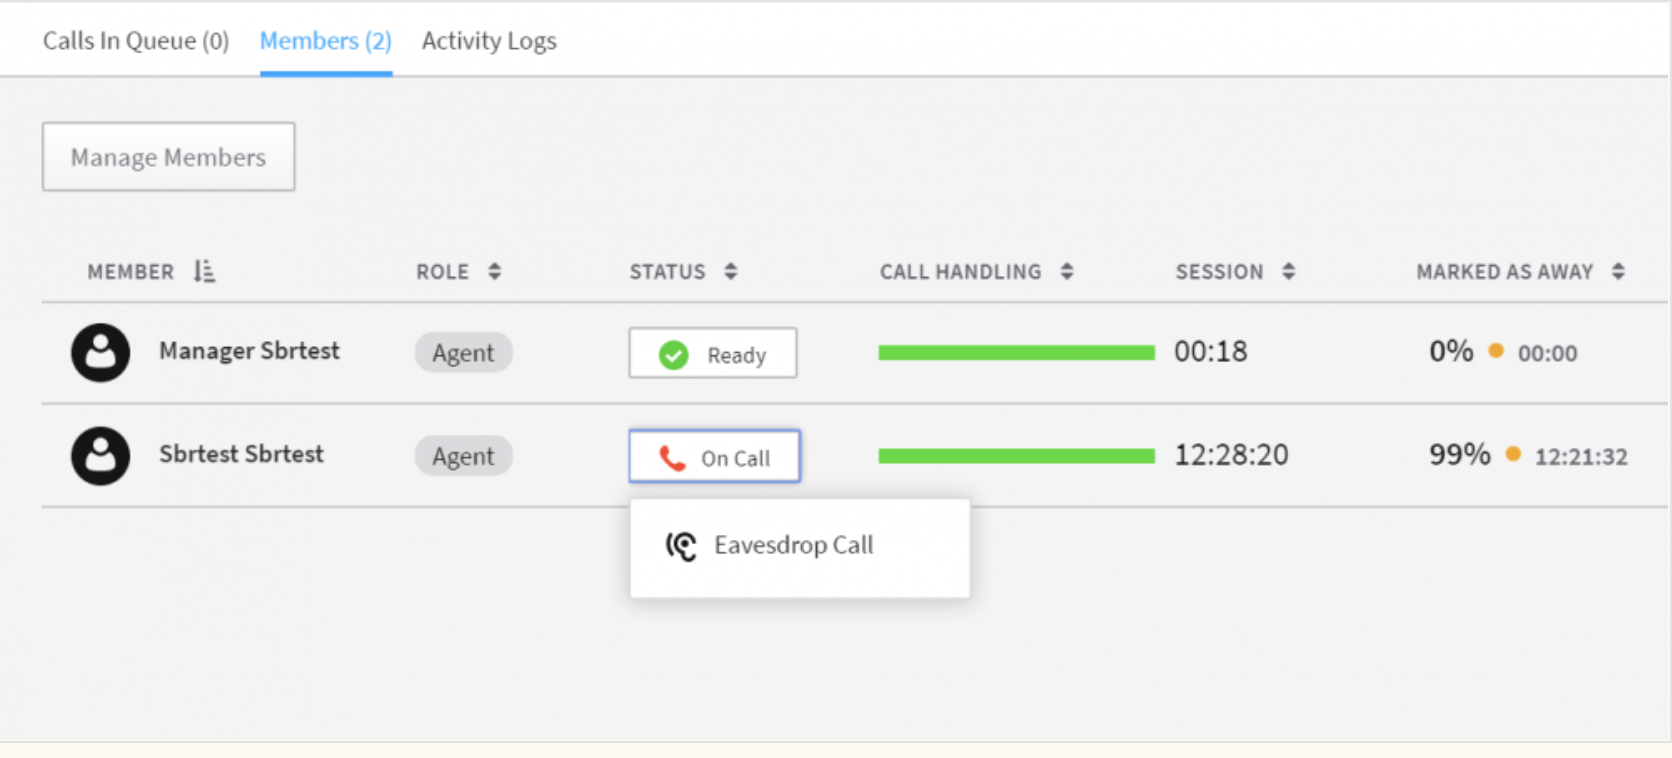
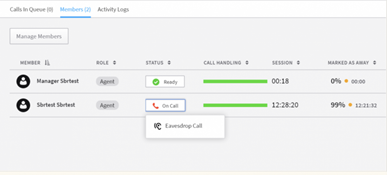
QUEUE MEMBERS LIST
This shows the activity of the users
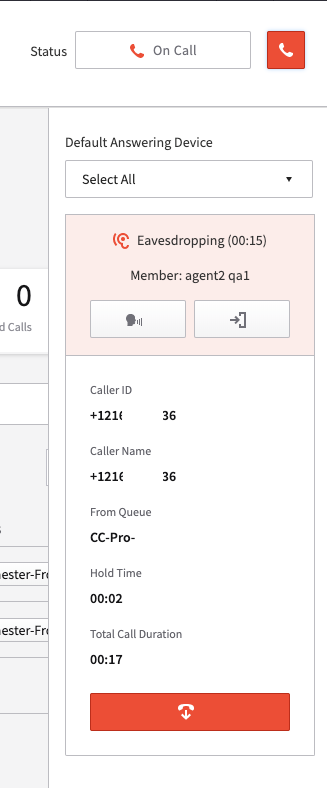
NEW: Eavesdrop / Whisper / Barge Settings
As a manager or admin, you can monitor an agent’s call while it is in session by clicking on the “On Call” status in the queue dashboard.
This can be used while training a new agent. The following options are available:
- Eavesdrop
Allows the manager/admin to listen in on the call only. - Whisper
Allows the manager/admin to listen and whisper notes or suggestions to the agent. The caller will not hear this. - Barge
Allows the manager/admin to join the call. The caller will be included.
NOTE: In order to Whisper or Barge a call, the manager or admin must select the eavesdrop option first. While eavesdropping a call, the call display drawer will show the display as below.
ACTIVITY LOG
NOTE: The queue activity log will only show Agents’ detailed activities for the past hour only.
It will display detailed notes about the activity for each member, as below:
CALL HANDLING
When a call is ringing
Incoming calls will display from the queues dashboard as shown below.
To view the details of an incoming call, click on the phone icon in the upper right corner to display the Call Details Drawer.
Once a call is answered
When a call is answered, the status for the agent will automatically change to “On Call.” The agent can view the call details in the same drawer to the right.
NOTES:
- Queue Status will display “Missed” only for four seconds after the call is missed. It will return back to “Active” after the 4 seconds is reached.
- If Queue Agent Behavior is configured to have Recovery time. Queue status will display “recovery” for that amount of time after the Agent completes the call.

If you click on a call and then on the phone icon, a side screen will show the details of the call.
Calls in Queue
When an incoming call is received, and no agents are available they will be added to the queue.
Agent / Queue Status Behavior
Call Offer States
The chart below shows how status settings affect the call offer behavior.
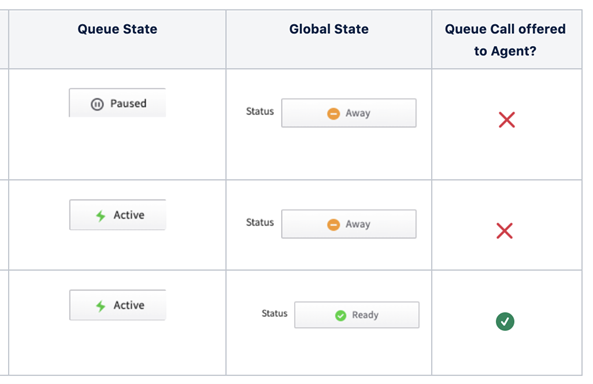
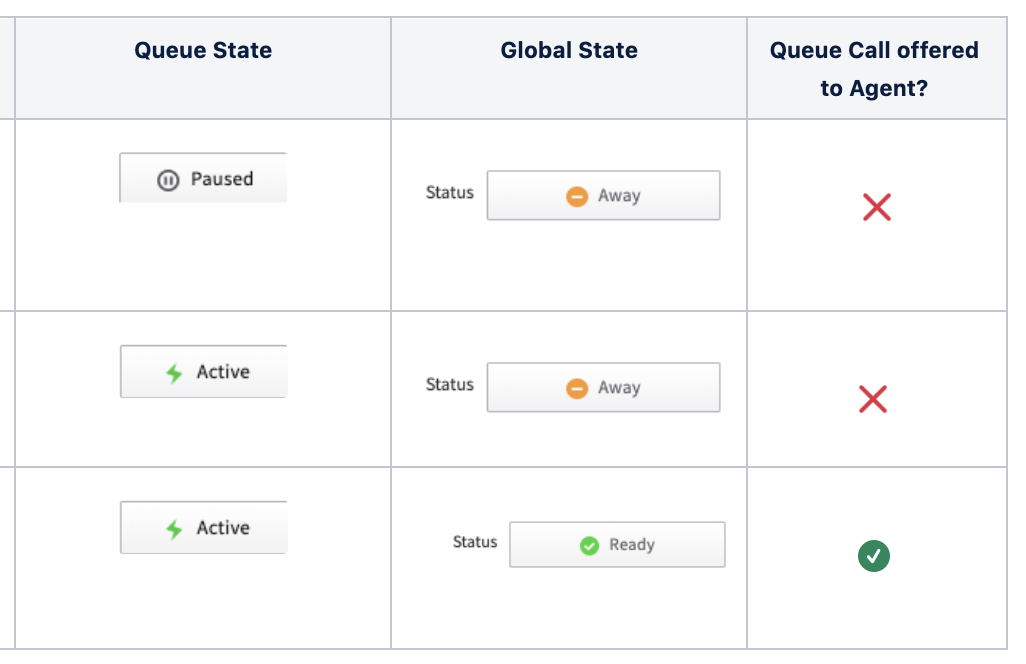
NOTES:
- An agent is available to take a call only if the agent is “Active” for that queue and “Available” Globally
- If an agent is newly assigned to a Queue. The Agent will automatically be in a Paused State for that Queue.
- Note if Agent is using Feature Code, Agent must log in to Browser set themselves in an active state first before using feature code functionality. Feature codes are global.
- Note if Agent is using Feature Code, Agent must log in to Browser set themselves in an active state first before using feature code functionality. Feature codes are global.
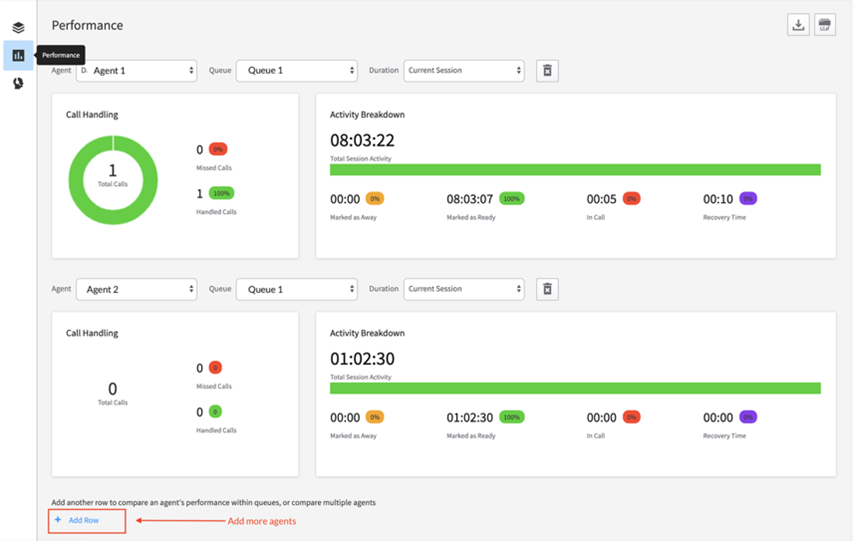
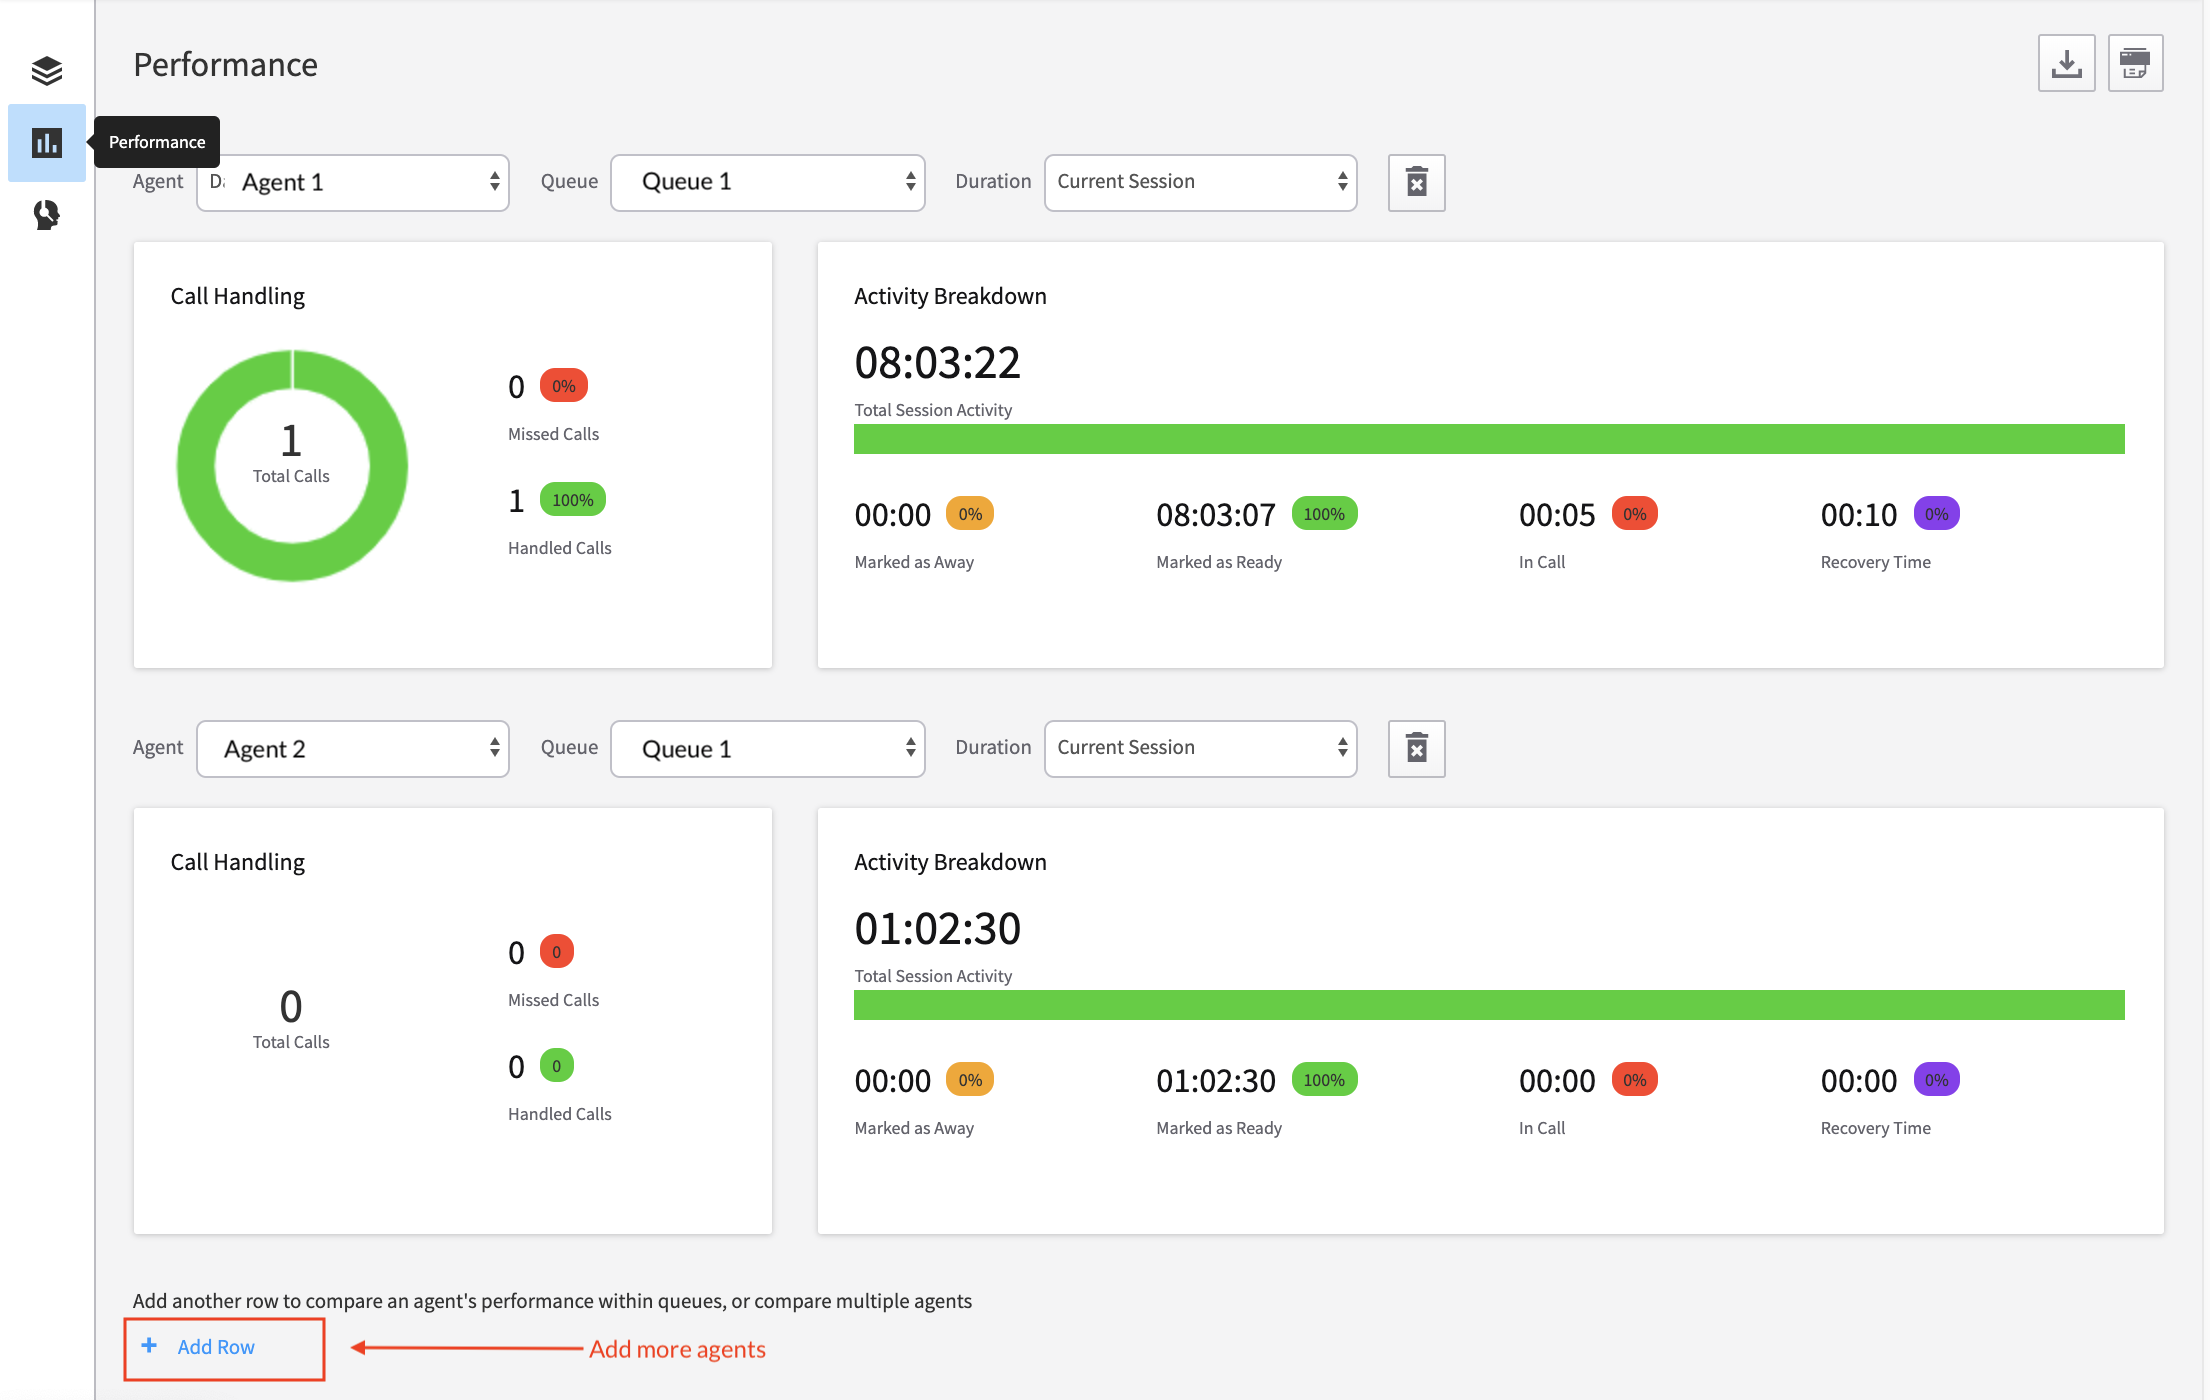
When you pick the graph icon to the left, you will see a screen summarizing call performance indicators.
- At the top you can choose the Agent, a queue, and a duration to review.
- At the bottom left of the screen you can choose to add another agent or group to compare indicators.
- These results can be further analyzed if you download the data to a .csv file. The option for that is at the top right of your screen next to the print option.
Managing Members and Assigning Skills
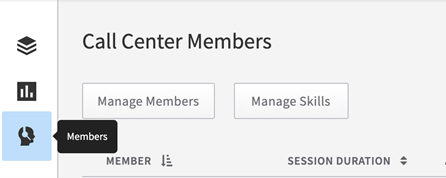
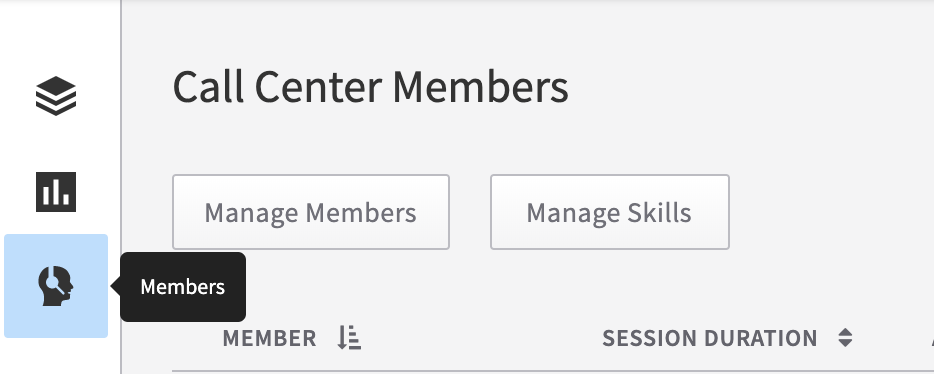
Managers and Admins can manage member attributes from the Call Center Members tab, accessed on the left of the screen.
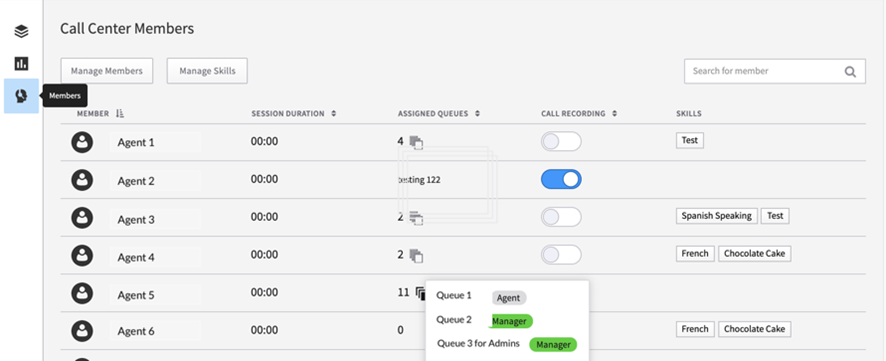
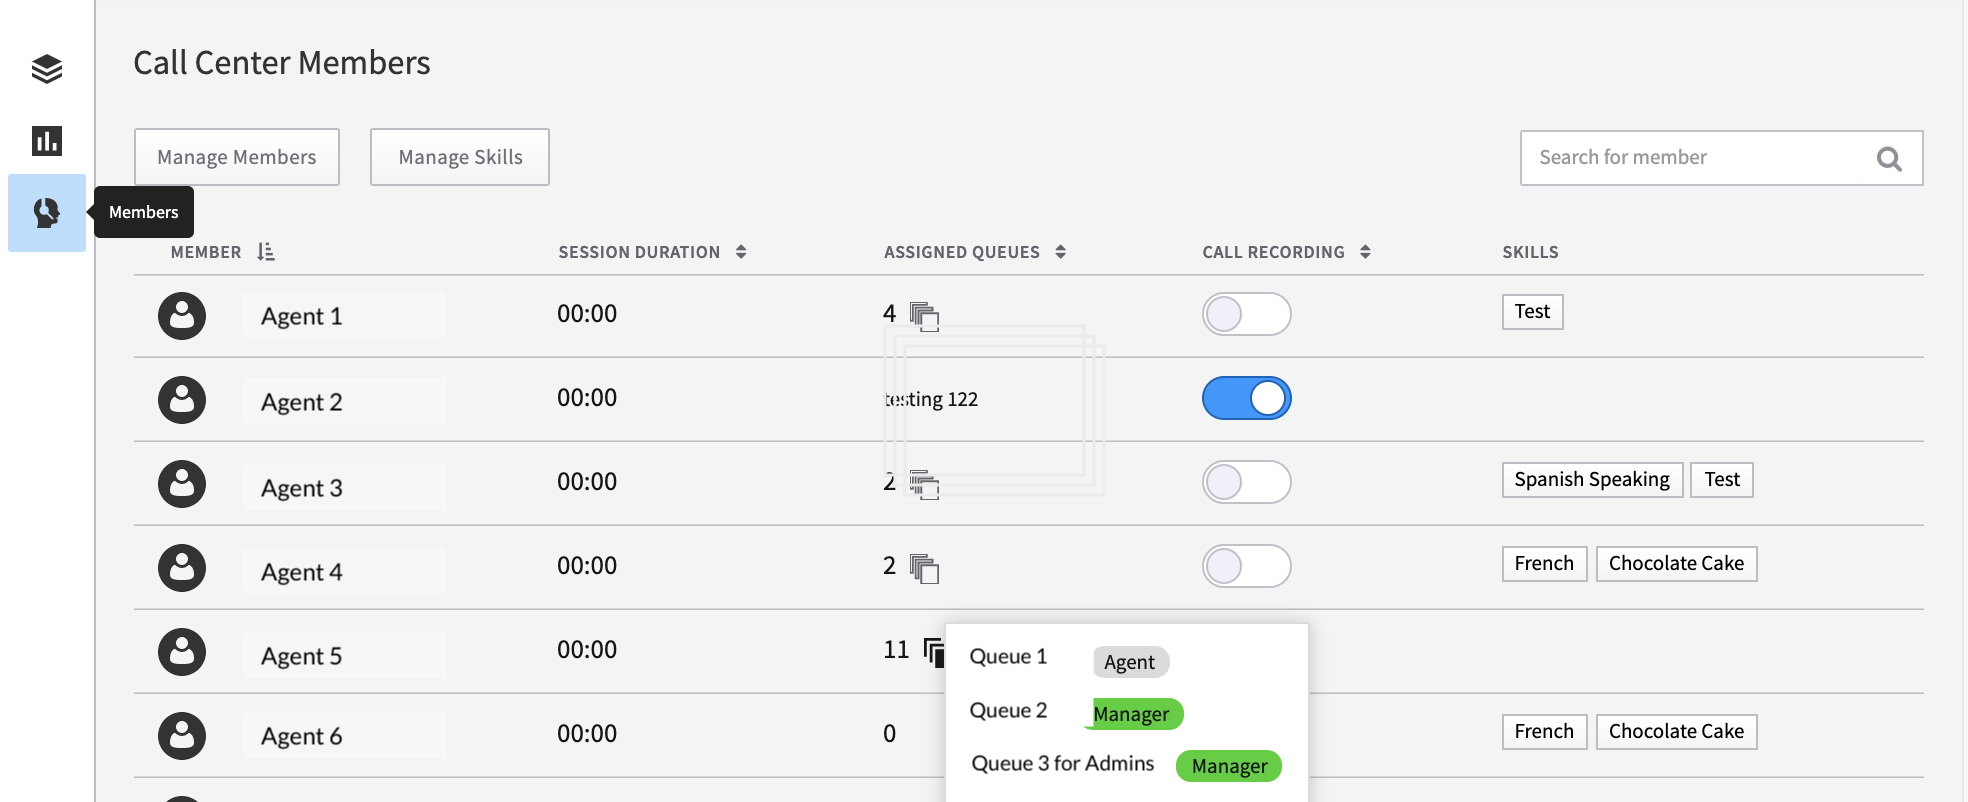
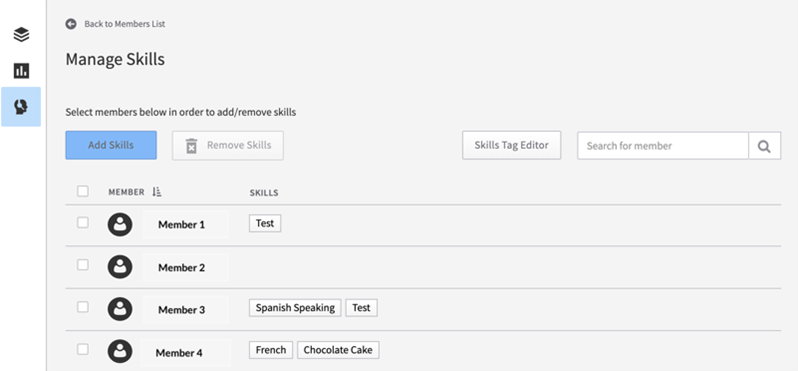
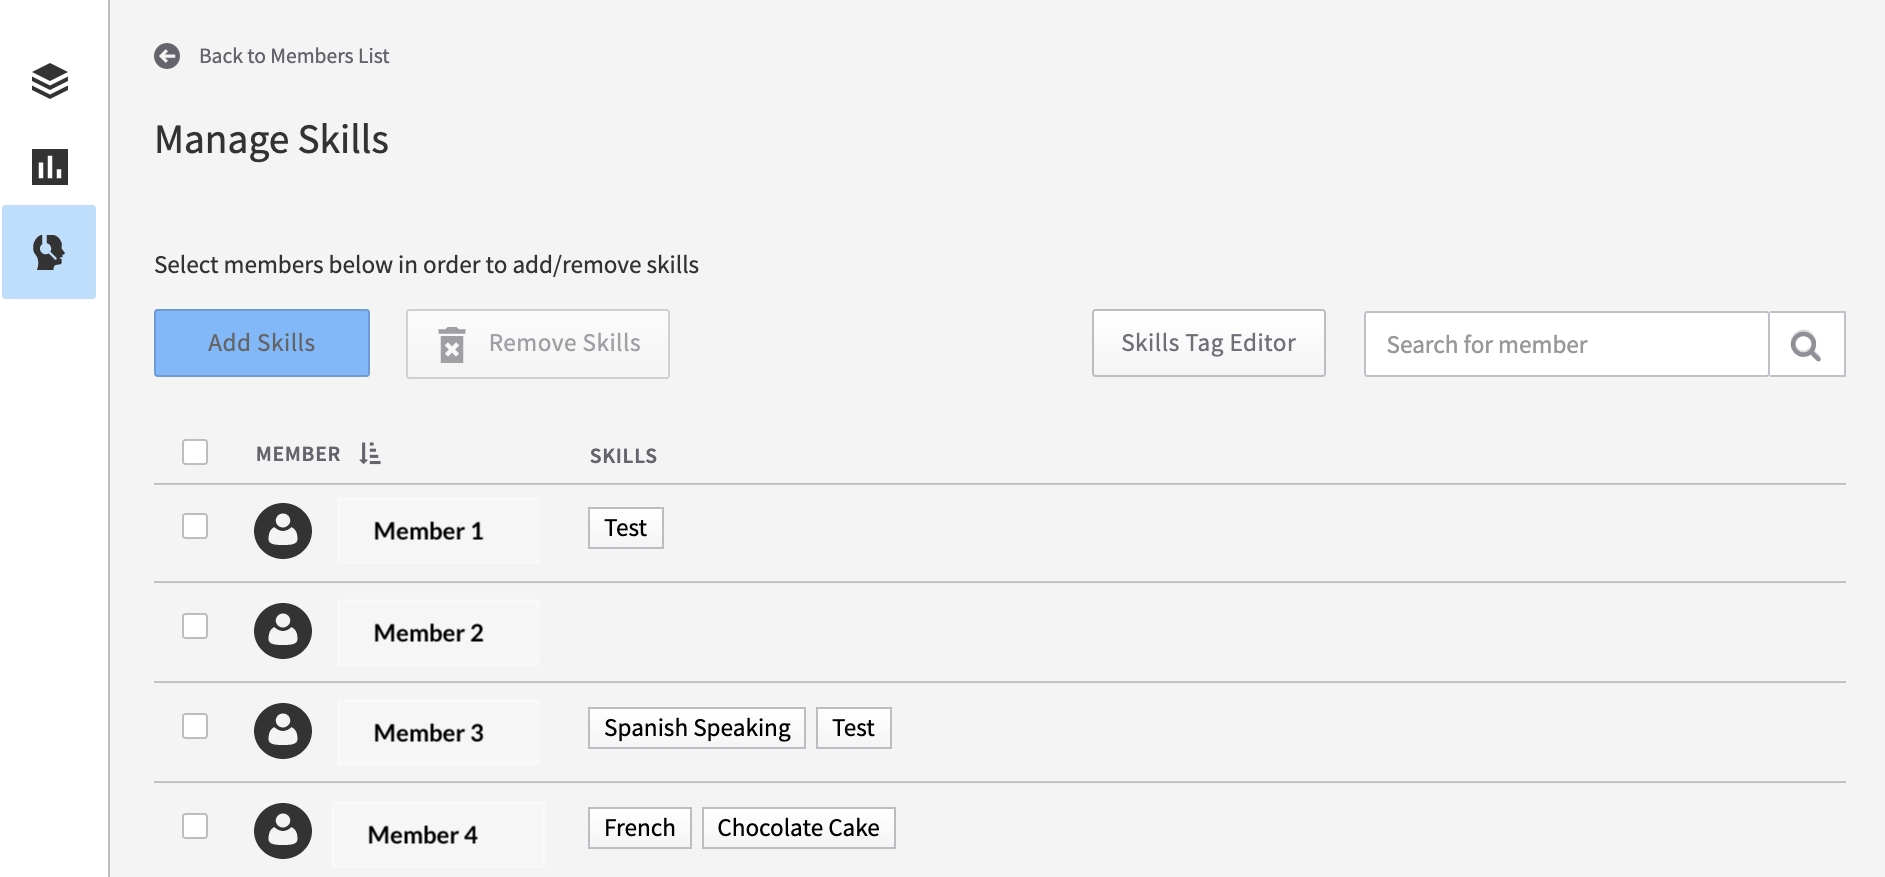
The default screen will list all the members in the call center, and display the name, session duration if active, the number and name of queues the agent is assigned to, if call recording is activated, and the skills assigned to that member.
NOTE: The skills assigned are global; whether they are implemented is dependent on the Routing Strategy setting in each queue.
MANAGE MEMBER LINK
This enables a manager or admin to move any user set up in the system as a Call Center Member. Only Call Center Members can be assigned queues.
MANAGE SKILLS LINK
This is where to assign or remove skills to a Call Center Member. The initial screen will show an alphabetical list of all members and the skills currently assigned.
Note: Skills are global attributes, they are not assigned per queue. If you have not set your queue routing to support skills, then they will not be noticed.
Add an Existing Skill to Member(s)
To add skills, select the members you want to include in the new skill and press the blue add skills button. You will be prompted to type in a skill already saved.
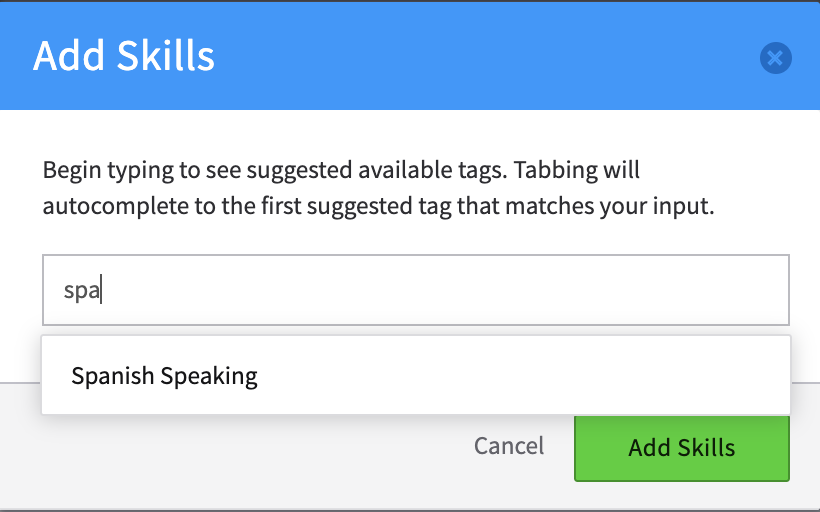
Create / Edit Skills
Skills can currently be assigned based on incoming Caller OR Callee ID Name or Number. Some common uses for this are
Incoming Callee ID name or number
- Tag phone numbers for certain types of support to different support services
- Tag phone numbers for sales to sales department
Incoming Caller ID name or number
Use this If you have multiple dial in numbers / DID’s that point to the same queue, but want to assign a skill based on which number the caller actually dialed to hit the queue.
- Tag calls from different countries to match language specialists
- Tag calls from large accounts to specific account managers
Operator Notes
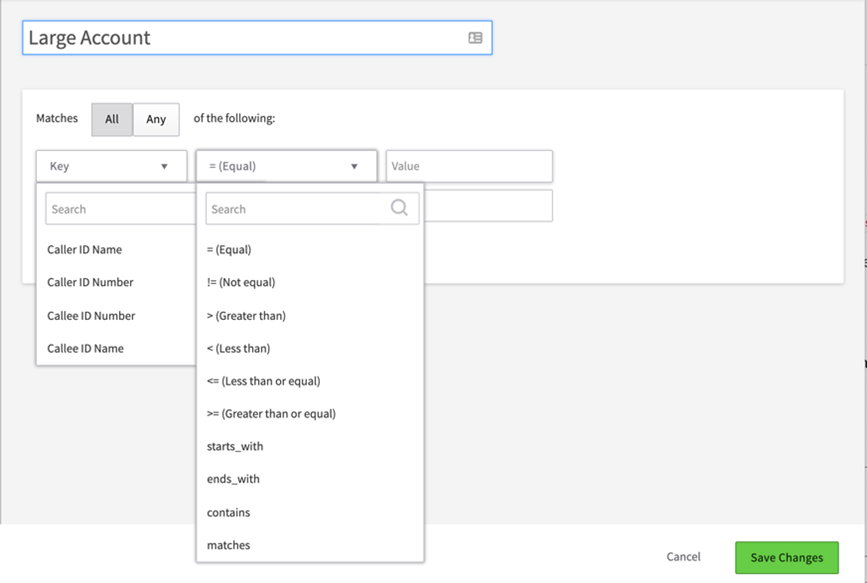
- starts_with: use to route calls with certain area codes. NOTE: Make sure to add +1 (country code) then the area code.
- matches: This is an exact match
- NOTE: This is the only operator where you can enter a regex code. Enter the regex code in the value field.
examples are below:- Match caller ID number starting with +1585 in regex form is ^\+1585
- Match Caller ID number that ends with 5336 would be /?5336
- For help with generating and testing regex codes, go to https://regexr.com/
- NOTE: This is the only operator where you can enter a regex code. Enter the regex code in the value field.
ADD A NEW SKILL
- Select the blue New Skill Tag button
- Set operator rules as shown below to match values.
- You can set multiple rules for each Skill. This is helpful for use with “Spanish speaking”, as you can assign multiple country codes.
- If there are multiple rules and skill is set to Match “All” all of the rules must match.
- If it set to “Any” any of the rules can match to route to the agent.
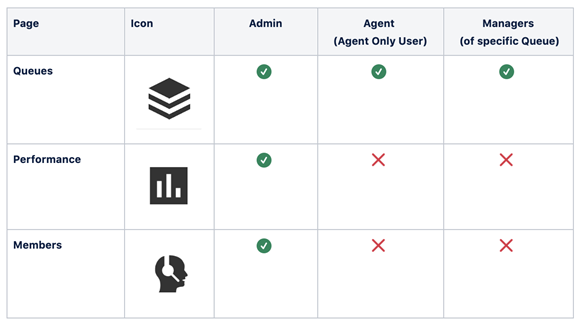
Summary of Permissions and Access
There are three levels of permissions used in Call Center Pro:
- Agents
- Managers
- Administrators
Below is an overview of the kind of access needed to create, edit, and delete certain settings.